Your Warrior ID Card photo is your official image for Stanislaus State and photos may be used for official university business. To receive your Warrior ID Card we ask that you submit a passport-style color photo. You can upload a color snapshot showing a full front view of your head and shoulders according to the requirements shown on this site. By using this process you will avoid lines and save valuable time. By submitting this photo for your Warrior ID Card you agree this photo may be used by Stanislaus State Student Records and or Student Health Center. Please contact our office if you have questions about this policy at warriorcard@csustan.edu.
To begin, go to the Get Started Now button on the page.
Step 1 of 8
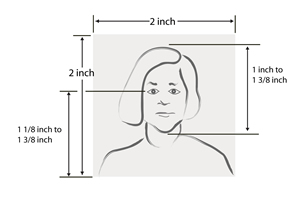
The above photos represent acceptable photos. Notice they are very similar in size and requirements of passport photos.
When taking your photo, please use the following as guidelines to ensure your photo is accepted:
- Current color photo with a solid white or light color background, taken indoors with natural lighting and flash
- Full-face passport style headshot directly facing and looking at the camera with open eyes, a natural expression and no tilting of the head. Smiling is encouraged
- No hats, sunglasses, headphones or other accessories which obstruct a complete view of the face. Only one person may appear in the photo. Prescription glasses (without glare) and religious head coverings are allowed
- Do not crop or edit your photo in any way before submitting. You will be given the opportunity to crop the photo on Step 3
- Only high-resolution JPEG (.jpg) files will be accepted
Have your picture taken according to the diagram below:
Once you have a properly formatted photo, please proceed to Step 2. You will have the ability to crop your photo in Step 3.
- To proceed to Step 2 you must select the “Terms” check box by clicking in the box on Step 1 of the photo upload site as shown below.
- Click the "Continue to Step 2" button.
Step 2 of 8
This page displays your account information used by the photo upload application:

Step 3 of 8
If you need to, you can use this online tool to crop or resize your photo. After you have finished, you will be able to compare your photo with a sample provided. When you are satisfied with your photo, continue to Step 4.
You may also choose to remove the file and start over with a new photo.
Step 4 of 8
Preview and compare your photo with the sample photo provided.
Click on the radio button that answers the following question:
Does your photo format look like the given example?
If you selected yes, continue to the next paragraph that explains your acceptance and understanding of submitting your photo using this online tool:
Click on the box that says "Submit Photo". This will upload your photo to be reviewed and printed onto your new card.
- Click the "Continue to Step 5" button.
Step 5 of 8
Upload a photo of your Government ID - Driver 's license or Passport Identification Page.
Click on the "Choose File" button to browse for your Government ID photo. On mobile devices it will start your camera or open the file explorer app. If you’re using a computer, this will launch a dialog box in your browser. You can snap a picture with your mobile device or select the location of your file. Once you have selected the photo's file location, select it by clicking on the "Open" button in the dialog box.
- Click the "Continue to Step 6" button to upload your photo to the system.
Step 6 of 8
If needed, you can use this online tool to rotate, crop or resize your photo. After you are finished you will be able to compare your photo with a sample on Step 4. Please edit your photo now, remove the file and start over, or if you are satisfied, click the "Continue to Step 7" button.
- Click the "Continue to Step 7" button.
Step 7 of 8
Step 7 will display a sample driver's license ID Card and preview of your government ID photo. Compare the sample ID photo with your uploaded ID photo shown. Your government ID photo must show clear, legible information to verify your identity. This information will be deleted from the system once your photo submission is approved.
- Click on the button that answers the following question
Does your government ID clearly show the information to verify your identity as the given example? Yes or No
- If you selected yes, continue to the next paragraph that explains your acceptance and understanding of submitting your photo using this online tool. You must select the check box by clicking in the box to continue with the photo upload process.
- Click the button "Continue to Step 8" button.
Step 8 of 8
If your photo has been uploaded successfully, a confirmation message will be sent displaying your ID Number as shown below:
Your ID Number can be used to track the status of your submission from the "Check Status" page. Your confirmation number is your ID Number: 001234567.
Thank you for submitting your photo to Self-Photo Upload System. Your photo has been successfully uploaded to our database. You can use your ID Number to follow the status of your photo.